How to Make Digital Negatives
since: 2019/01/01
update: 2019/01/01
reference:
1. How to Make Digital Negatives | Freestyle Photographic Supplies
2. Love alternative photographic processes? « AlternativePhotography.com
3. Stouffer Industries
4. How To Make Digital Negatives - Parallax Photographic Coop
5. How to make digital negatives « Negatives « AlternativePhotography.com

---------------------------------------------------------------------------
Following is a relatively simple three step method for making digital negatives. With some of the more forgiving processes like gum and casein, only the first two steps may be necessary. The system is based on the Epson printer that uses Ultrachrome ink sets and comes with the Advanced Black & White System installed in the driver. The best transparency film substrates are made by Arista, Ink Press, or Pictorico; have some on hand. Capture the image in camera either RAW or TIFF at the largest file size possible. Also, keep or convert the image to 16 bit depth and Adobe RGB (1998) or its grayscale equivalent, gamma 2.2.
以下是製作數字底片的相對簡單的三步法。 對於一些更寬容的過程,如口香糖和酪蛋白,只需要前兩個步驟。 該系統基於Epson打印機,該打印機使用 Ultrachrome 墨水套件,並在驅動程序中安裝了高級黑白系統。 最好的透明薄膜基材由 Arista,Ink Press 或 Pictorico 製造; 有一些在手。 使用最大文件大小以 RAW 或 TIFF 在相機中捕獲圖像。 此外,保持或轉換圖像為 16位 深度和 Adobe RGB(1998)或其灰度等效,伽瑪2.2。
Three-step negative workflow
三步驟負片工作流程
1. Determine the Basic Exposure Time for the photo process to be used to give maximum black.
確定用於提供最大黑色的照片處理的基本曝光時間。
2. Determine overall negative contrast to match the contrast of the process and give “paper white.”
確定整體負片對比度以匹配過程的對比度並給出“紙白”。
3. Make midtone adjustments to match the response curve of the process.
進行中間調調整以匹配過程的響應曲線。
Download step wedge Photoshop file
(下載步驟楔形Photoshop文件)
Step 1: Determining basic exposure time
第1步:確定基本曝光時間
The aim is to determine the minimum UV exposure needed to obtain maximum black when printing through the transparency material on which the negative is printed.
目的是確定在通過印刷負片的透明材料印刷時獲得最大黑色所需的最小 UV 曝光。
1. Coat a half-sheet of paper with the light sensitive emulsion of choice.
用選擇的光敏乳液塗在半張紙上。
2. Place a sheet of transparency material on top to cover half of the paper.
在頂部放置一張透明材料以覆蓋紙張的一半。
3. Place a sheet of opaque material so it covers both halves and leaves a strip exposed at the top.
放置一片不透明材料,使其覆蓋兩半,並在頂部留下條帶。
4. Make an exposure (maybe one minute).
曝光(可能是一分鐘)。
5. Move the opaque material down to uncover another strip and make another exposure.
向下移動不透明材料以露出另一條帶並再次曝光。
6. Continue this process until there is a series of increasing exposures extending across the junction between transparency material and no material.
繼續這個過程,直到在透明材料和沒有材料之間的連接處延伸一系列增加的曝光。
7. Develop the test sheet and dry it. Notice that on strips that received short exposures the boundary between transparency material and none can easily be seen. The goal is to find the exposure where this boundary becomes invisible. This is the minimum exposure that is capable of giving maximum black through the transparency material (or some other hue, e.g. maximum blue with cyanotype). Once the Basic Exposure is determined for that process on that paper it does not change. If a final print turns out to be too light or dark, this is an indication of another problem in the workflow.
開發測試表並將其乾燥。 請注意,在接受短曝光的條帶上,可以很容易地看到透明材料和非透明材料之間的邊界。 目標是找到這個邊界變得不可見的曝光。 這是能夠通過透明材料(或一些其他色調,例如具有青色的最大藍色)給出最大黑色的最小曝光。 一旦在該紙上確定了該過程的基本曝光,它就不會改變。 如果最終打印結果太亮或太暗,則表明工作流程中存在另一個問題。
Step 2: Negative contrast
第2步:負片對比度
The second step in making a digital negative is to adjust the overall contrast of the negative to match the contrast range of the emulsion.
製作數位負片的第二步是調整底片的整體對比度以匹配乳液的對比度範圍。
For example, a palladium emulsion requires a negative with rather high contrast (more ink). A gum emulsion requires a negative with fairly low contrast (less ink).
例如,鈀乳液需要具有相當高對比度的負片(更多墨水)。 膠乳劑需要具有相當低對比度的負片(較少的墨水)。
The way this adjustment is done is by controlling the maximum amount of ink the printer lays down.
完成此調整的方法是控制打印機放下的最大墨水量。
There are two sliders that can be used to adjust the printer’s ink limit.
有兩個滑塊可用於調整打印機的墨水限制。
The first is in the Advanced Black & White dialog of the driver. It is called the Max OD slider (Figure D). Its default setting is 0 and we will leave it at that setting.
第一個是驅動程序的高級黑白對話框。 它被稱為Max OD滑塊(圖D)。 它的默認設置為 0,我們將其保留在該設置。
The second slider is called the Color Density slider (Figure D2) and it is found by clicking on Printer Settings (see Figure C) and opening the Advanced Media Control dialog. The Default setting for the Color Density slider is 0 and this yields a relatively low contrast negative suitable for gum or cyanotype. Moving the slider towards +50% yields higher contrast negatives suitable for palladium or salt prints. Here is the workflow to determine the correct negative contrast to match the photo process.
第二個滑塊稱為“顏色密度”滑塊(圖D2),單擊“打印機設置”(參見圖C)並打開“高級媒體控制”對話框即可找到它。 “顏色密度”滑塊的“默認”設置為0,這會產生相對較低的對比度負值,適用於口香糖或青色。 將滑塊移向+ 50%會產生更高的對比度負片,適合鈀或鹽印。 以下是確定與照片處理相匹配的正確負對比度的工作流程。
1. Download the free Step Tablet image file at alternativephotography.com. Open the file in Photoshop. An image of this step tablet is shown in Figure A.
在 alternativephotography.com 下載免費的 Step Tablet 圖像文件。 在 Photoshop 中打開文件。 該步驟平板電腦的圖像如圖A所示。

2.Flip the tablet image horizontally (Image/Image Rotation/Flip Horizontal) and then invert to a negative (Image/Adjustments/Invert). Flipping the image ensures that left and right handedness will remain correct when the ink side of the negative is placed against the emulsion side of the paper during print exposure.
水平翻轉平板電腦圖像(圖像/圖像旋轉/水平翻轉),然後反轉為負片(圖像/調整/反轉)。 當在打印曝光期間將負片的墨水側放置在紙張的乳劑側時,翻轉圖像確保左手和右手保持正確。
3. The following instructions are specifically for a Mac computer running Photoshop CS6 with an Epson 4880 printer. However they also apply to CS5 and essentially any Epson printer that uses the Advanced B&W system.
以下說明專門針對運行帶有 Epson 4880 打印機的 Photoshop CS6 的 Mac 計算機。 但是它們也適用於 CS5 和基本上任何使用 Advanced B&W 系統的 Epson 打印機。
4. Go to File/Print. The dialog window that will open is shown in Figure B. In the dialog box:
轉到文件/打印。 將打開的對話框窗口如圖B所示。在對話框中:

a. Select the printer, Epson Stylus 4880.
選擇打印機,Epson Stylus 4880。
b. On the right side, under Color Management, check the button beside Document. Presumably it will say Profile Gray Gamma 2.2 since that is the profile that should have been embedded in the image file at the very start of this workflow. If it says anything else, go to the bottom, hit Cancel, bail out, go back and convert the image to gamma 2.2, and start the print process all over again (sob). If gamma 2.2 shows, go down to Color Handling and select Printer Manages Colors.
在右側的“顏色管理”下,選中“文檔”旁邊的按鈕。 據推測,它會說 Profile Grey Gamma 2.2,因為這是應該在此工作流程一開始就嵌入到圖像文件中的配置文件。 如果它說了什麼,請轉到底部,點擊取消,拯救,返回並將圖像轉換為 gamma 2.2,然後重新開始打印過程(嗚咽)。 如果顯示 gamma 2.2,請轉到“顏色處理”並選擇“打印機管理顏色”。
c. For Rendering Intent choose Perceptual (the default).
對於 Rendering Intent,選擇 Perceptual(默認值)。
d. Select either Landscape (horizontal) or Portrait (vertical) media orientation.
選擇橫向(水平)或縱向(垂直)介質方向。
e. Click on Print Settings. Another window will open (Figure C).
單擊“打印設置”。 另一個窗口將打開(圖C)。

f. Select the paper size (8½"x11").
選擇紙張尺寸(8½“x11”)。
g. Click on Layout and scroll down to Printer Settings.
單擊佈局並向下滾動到打印機設置。
h. Choose Paper Source (usually the paper tray).
選擇紙張來源(通常是紙盤)。
i. Choose Media Type: Premium Luster Photo Paper. This choice tells the printer to print with Photo Black Ink (as opposed to Matte Black Ink). Photo Black ink is a weaker UV absorber than Matte Black but it is strong enough for most processes.
選擇介質類型:高級光澤相紙。 此選項告訴打印機使用 Photo Black Ink(與 Matte Black Ink 相反)進行打印。 照片黑色墨水是一種比啞光黑色更弱的紫外線吸收劑,但它對大多數工藝來說足夠強大。
j. Under Print Mode select Advanced Black & White.
在打印模式下,選擇高級黑白。
k. Color toning, leave it at neutral.
色調,讓它保持中立。
l. Output Resolution. Set at the maximum of 2880 dpi. This is important for obtaining the highest quality negatives.
輸出分辨率。 最大設置為 2880 dpi。 這對於獲得最高質量的底片非常重要。
m. Turn OFF High Speed.
關閉高速。
5. With all these settings entered, go back up to the middle of the window and click on Advanced Color Settings. A window will open with an image of a blond woman off to one side and a bunch of various sliders (Figure D). Only change one thing in this window:
輸入所有這些設置後,返回到窗口中間並單擊“高級顏色設置”。 將打開一個窗口,其中一個金發女人的圖像偏向一側,一堆各種滑塊(圖D)。 只在此窗口中更改一件事:

a. Near the color circle is a box labeled Vertical. Type the number 75 into this box. This action causes the printer to throw the maximum amount of yellow ink into the image. Yellow is the strongest UV absorber after Photo Black. Increasing yellow makes the UV more dense and negatives more contrasty. Hit SAVE.
在彩色圓圈附近是一個標記為垂直的框。 在此框中鍵入數字75。 此操作會導致打印機將最大量的黃色墨水投入圖像。 黃色是 Photo Black 之後最強的紫外線吸收劑。 增加黃色使紫外線更密集,負面更具對比度。 點擊 SAVE。
6. Now go back to Print Settings, click on Layout, and on the drop down menu select Advanced Media Control. Move the Color Density slider to set the contrast of the negative (Figure D2). The default position of 0 is about right for gum and cyanotype while higher settings, in the +30-40% range, are needed for palladium or salt. Hit SAVE.
現在返回打印設置,單擊佈局,然後在下拉菜單中選擇高級媒體控制。 移動“顏色濃度”滑塊以設置負片的對比度(圖D2)。 0 的默認位置對於口香糖和青色是正確的,而對於鈀或鹽需要在 + 30-40% 範圍內的較高設置。 點擊 SAVE。

7. Slide a sheet of transparency material into the paper tray, hit Print, and make a negative. Use a hair dryer to blow-dry the negative for a minute or two to get rid of all milkiness if the negative is to be used right away.
將一張透明材料滑入紙盒,點擊“打印”,然後製作底片。 如果要立即使用負片,請使用吹風機吹乾負片一兩分鐘以消除所有乳狀。
8. Take the printed step tablet negative and use it to expose a sheet of paper coated with the photo emulsion, using the Basic Exposure Time determined in Step 1.
取印刷的 step tablet 負片並使用它來曝光塗有光乳劑的紙張,使用步驟1中確定的基本曝光時間。
When making the exposure, lay a small piece of opaque plastic so it slightly overlaps the 0% patches of the negative. Process and dry the step tablet print.進行曝光時,放置一小塊不透明塑料,使其略微重疊 0% 負片的補丁。處理並乾燥步驟平板打印。
The dark, 100% patches of the print should be as black as the process can manage since that is controlled by the Basic Exposure.
黑暗的 100% 打印件應該像過程可以管理的那樣黑,因為它是由基本曝光控制的。
Now look at the area under the opaque plastic. This area has been coated by emulsion chemistry but has received no exposure. This reference area is the lightest tone obtainable with this particular emulsion. If the correct negative contrast setting has been chosen (Color Density slider, remember?) the lightest, 0% patches of the print will be very close in tone to the tone of the reference area.
現在看看不透明塑料下面的區域。該區域已經通過乳液化學塗覆,但沒有暴露。該參考區域是用這種特定乳液可獲得的最輕的色調。如果選擇了正確的負對比度設置(色彩濃度滑塊,請記住嗎?),最淺,0%的打印色塊將與參考區域的色調非常接近。
If the 0% patch is noticeably grayer than the reference area, it is necessary to go through the process again but this time move the Color Density slider to the right a bit to increase contrast. On the other hand, if several of the lightest steps look as white as the reference area, contrast is too high and it is necessary to move the slider to the left.
如果0%貼片明顯比參考區域更粗,則需要再次完成該過程,但這次將顏色密度滑塊向右移動一點以增加對比度。另一方面,如果最輕的幾個步驟看起來像參考區域一樣白,則對比度太高,需要將滑塊向左移動。
To streamline this process, make a series of step tablet negatives, one with the Color Density slider set at 0, another at +10%, 20%, 30%, and 40%. These varying contrasts will probably cover the entire range needed for most photo processes. When calibrating a new process, print a few and quickly determine which contrast setting will be necessary.
要簡化此過程,請製作一系列步驟平板電腦底片,其中一個顏色密度滑塊設置為0,另一個設置為+ 10%,20%,30%和40%。這些不同的對比可能會涵蓋大多數照片處理所需的整個範圍。校準新過程時,打印一些并快速確定需要哪種對比度設置。
Step 2a: Advance media control
步驟2a:提前媒體控制
Another option for controlling negative contrast is to choose Enhanced Matte Paper as the Media option (instead of Luster Photo Paper).
控制負對比度的另一個選項是選擇增強遮罩紙作為介質選項(而不是Lustre Photo Paper)。
This choice will force the printer to use Matte Black ink which is a stronger UV absorber than Photo Black ink.
此選擇將迫使打印機使用啞光黑色墨水,這是一種比Photo Black墨水更強的紫外線吸收劑。
When using Matte Black ink the Color Density slider is no longer needed. The entire range of contrasts needed for most photo processes can be obtained by changing the Max OD slider (in the Advanced Black and White dialog) from – 12 (low contrast) to 0 (very high contrast).
使用啞光黑色墨水時,不再需要“顏色密度”滑塊。 通過將最大OD滑塊(在高級黑白對話框中)從-12(低對比度)更改為0(非常高的對比度),可以獲得大多數照片處理所需的整個對比度範圍。
Both Photo Black and Matte Black ink will produce good negatives. There is the option to use either one in case switching ink types is not desired. If making negatives for gum, casein, or cyanotype, use Photo Black ink and leave both sliders at their default positions.
Photo Black和Matte Black墨水都會產生很好的底片。 如果不需要切換墨水類型,可以選擇使用其中任何一種。 如果對口香糖,酪蛋白或冷色調產生負面影響,請使用Photo Black墨水並將兩個滑塊保留在默認位置。
Step 3: Midtone adjustments
第3步:中間調調整
To adjust image mid-tones a positive print of the step tablet shown in Figure A will be made, using a digital negative with its contrast adjusted for this particular photo process. This print is then measured to find out how far off the mid-tones may be, and with this information a correction curve is constructed to bring the midtones back into perfect linearity. Once constructed, this correction curve will be applied to the positive image file.
為了調整圖像中間色調,將使用數字負片製作圖A中所示的階梯片的正片,其對比度針對該特定照片處理進行調整。 然後測量該印刷品以找出中間色調可能有多遠,並且利用該信息構造校正曲線以使中間色調恢復到完美的線性。 構建後,該校正曲線將應用於正圖像文件。
1. Print a digital negative of the step tablet. Flip the image horizontally, invert to negative, and print it on transparency material using the described printer driver settings, including the Color Density slider setting that gives the correct overall negative contrast for the photo process.
打印步驟平板電腦的數字負片。 水平翻轉圖像,反轉為負片,然後使用所述的打印機驅動程序設置將其打印在透明膠片材料上,包括“色彩濃度”滑塊設置,該設置可為照片處理提供正確的整體負片對比度。
2. Expose this tablet negative to the photo emulsion using the Basic Exposure Time previously established.
使用之前建立的基本曝光時間將此片劑陰性曝光於照片乳劑。
3. When making the exposure, be sure to place a small piece of opaque plastic to slightly overlap the lightest patches of the tablet (the 0% patches).
進行曝光時,請務必放置一小塊不透明塑料,使其與平板電腦最輕的貼片(0%貼片)略微重疊。
4. Process and dry the tablet print.
處理並乾燥平板電腦打印。
5. Scan the tablet print using a flatbed scanner set to Reflectance Mode. In the dialog box (Figure E) click on the General tab and under Original choose Reflective.
使用設置為反射模式的平板掃描儀掃描平板電腦打印件。 在對話框(圖E)中,單擊“常規”選項卡,然後在“原始”下選擇“反射”。

6. Next, click on the Frame tab (Figure F).
接下來,單擊Frame選項卡(圖F)。

a. Scan Type. Choose 16/8bit grayscale (this is their way of saying that the scan will be in 8 bit depth).
掃描類型。 選擇16/8位灰度(這是他們說掃描將在8位深度的方式)。
b. Set the resolution slider to 180dpi (low resolution is fine).
將分辨率滑塊設置為180dpi(低分辨率很好)。
7. Hit the Prescan button. The scanner will make a very low resolution scan of the entire glass. Move the guidelines to limit the final scan to just the step tablet.
點擊預掃描按鈕。 掃描儀將對整個玻璃進行非常低分辨率的掃描。 移動指南以將最終掃描限制為步驟平板電腦。
8. Now go up and hit the histogram button at the top (third button from the left). This will open up a histogram of the step tablet prescan (Figure G). Move the shadow and highlight sliders so they are just outside of all the pixels (the dark stuff). Make sure the middle slider remains at 0. This will ensure that the scanner records all the information seen by the photo receptors and does not clip either the shadows or the highlights. Now go back to the main dialog box and hit Scan.
現在上去並點擊頂部的直方圖按鈕(左起第三個按鈕)。 這將打開步驟片劑預掃描的直方圖(圖G)。 移動陰影並突出顯示滑塊,使它們位於所有像素之外(黑暗的東西)。 確保中間滑塊保持為0.這將確保掃描儀記錄光接收器看到的所有信息,並且不會剪切陰影或高光。 現在返回主對話框並單擊“掃描”。

9. The scanned image of the tablet print should open in Photoshop. Do the following things to this image:
平板電腦打印的掃描圖像應在Photoshop中打開。 對此圖片執行以下操作:
10. In Photoshop, go to the Windows menu, scroll down, and click on Info. The Info palette will open. In the upper right corner click on a small stack of lines that open the Panel Options window. For the First Color Readout select Grayscale. Close Panel Options but leave the Info Palette open. Now go to the Tool Bar, select the Eyedropper tool and in the tool options bar set the Eyedropper to measure an 11×11 pixel area (this further evens out the readings).
在Photoshop中,轉到Windows菜單,向下滾動,然後單擊“信息”。 信息面板將打開。 在右上角,單擊打開“面板選項”窗口的一小摞行。 對於First Color Readout,選擇灰度。 關閉面板選項,但打開Info Palette。 現在轉到工具欄,選擇吸管工具,在工具選項欄中設置吸管以測量11×11像素區域(這進一步均衡了讀數)。
11. Take a sheet of paper and write two column headings on it, Input and Output. Values in the Input column will be taken from the numbers written on individual steps of the step tablet.
拿一張紙,在上面寫上兩個列標題,輸入和輸出。 “輸入”列中的值將取自步驟平板電腦各個步驟上寫入的數字。
Values in the Output column will be numbers read from the adjusted scan image of the step tablet print, measured with the Eyedropper tool.
“輸出”列中的值將是從步進平板打印的調整後掃描圖像中讀取的數字,使用吸管工具測量。
If the contrast selected via the Color Density slider for the step tablet negative is nearly correct the first number pair may read Input 0, Output 1. It is nearly impossible to get the Output from the 0% step to actually read 0 without also raising contrast too high and clipping some of the high values.
如果通過步驟平板電腦負片的顏色密度滑塊選擇的對比度幾乎是正確的,則第一個數字對可以讀取輸入0,輸出1.幾乎不可能將輸出從0%步驟實際讀取為0而不提高對比度太高,削減一些高價值。
So I usually accept an Output reading of 1% as just fine. Hopefully the Output reading from the 5% step will be above 1% (5% would be perfect). I find it useful to make readings in 5% intervals up to 30%, every 10% from then on, and finally at 90%, 95%, and 100%.
所以我通常接受1%的輸出讀數就好了。希望5%步驟的輸出讀數將高於1%(5%將是完美的)。我發現以5%的間隔讀數達到30%,從那時起每10%,最後達到90%,95%和100%是有用的。
When done there will be two columns of paired numbers that will look something like Figure H. These number pairs describe a curve that shows how the image goes from pure white to pure black. On the original step tablet file Input equaled Output which means the midtones are linear.
完成後,會有兩列配對數字看起來像圖H.這些數字對描述的曲線顯示圖像如何從純白色變為純黑色。在原始步驟平板文件輸入等於輸出,這意味著中間調是線性的。
On the scanned step tablet print Input will almost never be the same as Output since most photo emulsions respond to UV light in a nonlinear, S-shaped fashion. The number pairs in the Input/Output table just created will correct this situation and completely linearize print midtones for this particular photo process.
在掃描步驟平板打印輸入幾乎不會與輸出相同,因為大多數光乳液以非線性S形方式響應UV光。剛剛創建的輸入/輸出表中的數字對將糾正這種情況,並完全線性化此特定照片過程的打印中間調。
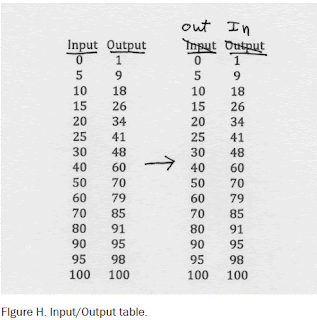
12. It is easy to make a correction curve from the number pairs in the Input/Output table (that is what all computer guys say just before pushing you into the deep end of the pool). Go to the top of the table, cross out Input and relabel it Output (this operation is shown in Figure H). Likewise, cross out Output and relabel it Input. Voilà! These are the number pairs needed to construct the correction curve.
可以很容易地從輸入/輸出表中的數字對進行校正曲線(這是所有計算機人員在將您推入池的深層之前所說的)。 轉到表格的頂部,劃掉輸入並重新標記輸出(此操作如圖H所示)。 同樣,交叉輸出並重新標記輸入。瞧! 這些是構建校正曲線所需的數字對。
13. To use these number pairs, open any image file in Photoshop in order to access the Curves dialog box (with an image file open, go to Image/Adjustments/Curves).
要使用這些數字對,請在Photoshop中打開任何圖像文件以訪問“曲線”對話框(打開圖像文件,轉到“圖像/調整/曲線”)。
14. Toward the bottom of the dialog box, click on the button beside Pigment/Ink%. Now, go up to the diagonal line in the Curves box and click anywhere on the line to place an active point (this is shown in Figure I). When this is done two more boxes will appear, labeled Input and Output.
在對話框底部,單擊Pigment / Ink%旁邊的按鈕。 現在,轉到“曲線”框中的對角線,然後單擊該行上的任意位置以放置一個活動點(如圖I所示)。 完成此操作後,將出現另外兩個框,標記為輸入和輸出。

15. Go to the Input/Output numbers (relabeled to describe a correction curve) and type in the first pair of numbers. The active point will move to the correct position.
轉到輸入/輸出數字(重新標記以描述校正曲線)並輸入第一對數字。 活動點將移動到正確的位置。
16. Now add another active point, above the first point, and type in the next number pair. And so forth until all points for the entire correction curve have been added. Note: Photoshop only allows 16 points on the curve, so choose points where they really seem needed to define the curve (in the middle not so many points are needed). And Photoshop will not insert points that are less than 2% apart, so choose further spaced points. Remember that the real correction curve never dips down (it will always ascend) and will not have jagged dips and rises. It is quite acceptable to look at the finished curve and manually correct it to a smooth, reasonable curve.
現在在第一個點上方添加另一個活動點,然後鍵入下一個數字對。 等等,直到添加了整個校正曲線的所有點。 注意:Photoshop只允許曲線上有16個點,因此選擇它們確實需要的點來定義曲線(中間不需要那麼多點)。 Photoshop不會插入間距小於2%的點,因此請選擇更多的間隔點。 請記住,真正的修正曲線永遠不會下降(它總是會上升)並且不會出現鋸齒狀的下降和上升。 查看完成的曲線並手動將其校正為平滑合理的曲線是完全可以接受的。
17. Once the curve is constructed, click on the stacked lines in the upper right corner and choose Save Preset. Name the curve and choose a place to save it. A good suggestion is to make one folder to house all curves.
構建曲線後,單擊右上角的堆疊線條,然後選擇“保存預設”。 命名曲線並選擇要保存的位置。 一個好的建議是製作一個文件夾來容納所有曲線。
Final notes to this 3-step system
這個3步系統的最後註釋
It is not necessary to go through all three steps every time. Step 1 is necessary to establish a Basic Exposure Time. It is almost always necessary to go through Step 2 and adjust the contrast of the image. Step 3 may not be needed. For several processes that utilize a low contrast negative (ie, gum, casein, cyanotype) quite acceptable results can be obtained by just going through Steps 1 & 2 and skipping Step 3. Try it and see. However, for processes that need a higher contrast negative (examples are platinum/palladium, salt, and ziatype) without a midtone correction curve shadows will be much too dark and blocked up while highlights will be washed out.
沒有必要每次都經歷所有三個步驟。 建立基本曝光時間需要步驟1。 幾乎總是需要通過步驟2並調整圖像的對比度。 可能不需要步驟3。 對於使用低對比度陰性(即口香糖,酪蛋白,青色型)的幾種方法,只需通過步驟1和2並跳過步驟3即可獲得完全可接受的結果。試試看。 然而,對於需要較高對比度負片(例如鉑/鈀,鹽和ziatype)而沒有中間調校正曲線的過程,陰影將太暗並且被遮擋而高光將被沖洗掉。
Monochrome digital negative
單色數位負片
1. If the image is in color, convert it to black and white. The most flexible way to do this is to go to Image/Adjustments/Black&White. Play with the sliders until the desired look is achieved and click OK.
如果圖像是彩色的,請將其轉換為黑白圖像。 最靈活的方法是轉到圖像/調整/黑白。 使用滑塊播放,直到獲得所需的外觀,然後單擊“確定”。
2. Even though the image is now monochrome, it is still in RGB mode. Go to Image/Mode and select Grayscale.
即使圖像現在是單色的,它仍處於RGB模式。 轉到圖像/模式並選擇灰度。
3. Be sure the image has gamma 2.2 embedded in it (the grayscale equivalent of Adobe RGB (1998)). Go to Edit/Convert to Profile (NOT Assign Profile) and choose Grey gamma 2.2 as the destination space. If, eventually, Step 3 of this digital negative workflow is done, the digital step tablet has gamma 2.2 embedded in it. It is important to be consistent and have the same profile embedded both in the image file and in the step tablet used to calibrate the overall process. Flatten the image if it is not already (Layer/Flatten Image).
確保圖像中嵌入了gamma 2.2(相當於Adobe RGB(1998)的灰度等級)。 轉到編輯/轉換為配置文件(NOT Assign Profile)並選擇Gray gamma 2.2作為目標空間。 如果最終完成此數字負片工作流程的第3步,則數字步驟平板電腦中嵌入了gamma 2.2。 重要的是要保持一致並在圖像文件和用於校準整個過程的步驟平板電腦中嵌入相同的配置文件。 如果圖像尚未展平(圖層/展平圖像),則展平圖像。
4. Apply a Correction Curve to the positive image that was derived from Step 3 of the Digital Negative Workflow. This will be done only if Step 3 has been found to be necessary. First open the Curves dialog box (Image/Adjust/Curves). Click on the upper right stacked lines and choose Load Preset. A window will open. Find where the correction curve is stored and click on it to open and hit OK in the Curves window. The correction curve will be applied to the positive image file and the Curves window will close (the image file will also start to look rather weird because the correction curve distorts it).
將校正曲線應用於從數字負片工作流程的步驟3派生的正片圖像。 只有在發現步驟3是必要的時候才會這樣做。 首先打開“曲線”對話框(“圖像/調整/曲線”)。 單擊右上角的堆疊線條,然後選擇“加載預設”。 窗口將打開。 找到存儲校正曲線的位置,然後單擊它以打開並在“曲線”窗口中單擊“確定”。 校正曲線將應用於正圖像文件,曲線窗口將關閉(圖像文件也將開始看起來相當奇怪,因為校正曲線扭曲了它)。
5. Go to Image/Image Size. Set resolution to 360 ppi and size the image to the final print size.
轉到圖像/圖像大小。 將分辨率設置為360 ppi,並將圖像調整為最終打印尺寸。
6. Invert to negative (Image/Adjustments/Invert) being sure to invert the image layer and not the curve layer. The image should now only have two layers, the image itself and the curve layer.
反轉為負(圖像/調整/反轉),確保反轉圖像層而不是曲線層。 圖像現在應該只有兩層,圖像本身和曲線層。
7. Flip the image horizontally (Image/Image Rotation/Flip Horizontal) Flipping the image ensures that left and right handedness will remain correct when the ink side of the negative is placed against the emulsion side of the paper during print exposure. Now the image is ready to print.
水平翻轉圖像(圖像/圖像旋轉/水平翻轉)在打印曝光期間,當負片的墨水側面靠著紙張的乳劑側放置時,翻轉圖像可確保左右手的均勻性保持正確。 現在圖像已準備好打印。
8. Print out a negative using all the printer settings previously described, including the correct Color Density contrast setting.
使用前面描述的所有打印機設置打印出底片,包括正確的色彩濃度對比度設置。
Tricolor RGB negatives
三色RGB底片
1. Start with a color digital image that has been edited and is in Adobe RGB (1998) and 16 bit depth.
從已編輯的彩色數字圖像開始,採用Adobe RGB(1998)和16位深度。
2. Flatten the image to a single layer, then size it to 360ppi and the correct dimensions.
將圖像展平為單個圖層,然後將其調整為360ppi並選擇正確的尺寸。
3. Invert the sized image to negative (Image/Adjustments/Invert).
將尺寸圖像反轉為負值(圖像/調整/反轉)。
4. Save at this step since the next step cannot be undone.
保存在此步驟,因為下一步無法撤消。
5. Go to Window/Channels. This will open the Channels panel. In the upper right corner, click on the small stack of lines to open the Channel Options window. Scroll down and select Split Channels. This will cause the color image to disappear and be replaced by three grayscale images, one for the Red, one for the Green, and one for the Blue channel.
轉到窗口/頻道。 這將打開“頻道”面板。 在右上角,單擊一小堆線以打開“通道選項”窗口。 向下滾動並選擇“拆分頻道”。 這將導致彩色圖像消失並被三個灰度圖像替換,一個用於紅色,一個用於綠色,一個用於藍色通道。
6. Rename the Red separation as imagename_BLUEneg.psd, the Green separation as imagename_MAGENTAneg.psd, and the Blue separation as imagename_YELLOWneg.psd. Make a practice of also marking each negative as it comes out of the printer as Blue, Magenta, or Yellow since they look nearly identical.
將紅色分隔重命名為imagename_BLUEneg.psd,將綠色分隔重命名為imagename_MAGENTAneg.psd,將藍色分隔重命名為imagename_YELLOWneg.psd。 從打印機發出的每個底片都是藍色,洋紅色或黃色,因為它們看起來幾乎完全相同,所以也做一個練習。
7. Be sure that each negative file has Gray gamma 2.2 embedded in it (Edit/Convert to Profile/Select Gray Gamma 2.2 as the Destination Space).
確保每個負片文件都嵌入了Gray gamma 2.2(編輯/轉換為配置文件/選擇灰色Gamma 2.2作為目標空間)。
8. At this point there are two options. If the correct negative contrast has already been determined the negatives can be printed in the gum layer of choice at the Basic Exposure Time determined in Step 1 of the 3-step method and the Printer Settings determined in Step 2, including the correct Color Density setting for contrast.
此時有兩種選擇。 如果已經確定了正確的負對比度,則可以在3步法的步驟1中確定的基本曝光時間和步驟2中確定的打印機設置中,在所選的膠基層中打印底片,包括正確的色彩濃度設置 對比。
9. On the other hand if more fine-tuning of the midtones is necessary, a midtone correction curve as described in Step 3 will be necessary, but when applied to the RGB separations, it must be applied to the positive. Since at this point the RGB splits are negative, it is necessary to invert each file back to positive, apply the correction curve, then re-invert to negative. Be sure to invert the image, not the curve. Print the corrected negative using the Exposure and Printer Settings determined in Steps One and Two.
另一方面,如果需要對中間調進行更多微調,則需要如步驟3中所述的中間調校正曲線,但是當應用於RGB分色時,必須將其應用於正片。 由於此時RGB分裂為負,因此需要將每個文件反轉為正,應用校正曲線,然後重新反轉為負。 務必反轉圖像,而不是曲線。 使用步驟一和步驟2中確定的曝光和打印機設置打印校正後的負片。
Troubleshooting:
故障排除:
Can’t see the print options shown in figure B? No worries, newer mac operating systems have loaded an air print driver in your system, restricting access to certain options. To regain access, follow these steps: From System Preferences, select Printers and Scanners. Delete your printer. Now click Add Printer or Scanner. Click the + sign in the lower left corner. A box will pop up with printer names. From the list, select your printer. Under NAME: the name of the printer will appear. Under USE: you will see Secure Airprint. From that drop down, select your printer name. Close the box. You are now set.
看不到圖B所示的打印選項? 不用擔心,較新的Mac操作系統在您的系統中加載了空氣打印驅動程序,限制了對某些選項的訪問。 要重新獲得訪問權限,請執行以下步驟:從“系統偏好設置”中,選擇“打印機和掃描儀” 刪除您的打印機。 現在單擊添加打印機或掃描儀。 單擊左下角的+號。 將彈出一個包含打印機名稱的框。 從列表中選擇您的打印機。 在NAME下:將顯示打印機的名稱。 在USE下:您將看到Secure Airprint。 從該下拉列表中,選擇您的打印機名稱。 關上盒子。 你現在好了。
---------------------------------------------------------------------------
update: 2019/01/01
reference:
1. How to Make Digital Negatives | Freestyle Photographic Supplies
2. Love alternative photographic processes? « AlternativePhotography.com
3. Stouffer Industries
4. How To Make Digital Negatives - Parallax Photographic Coop
5. How to make digital negatives « Negatives « AlternativePhotography.com

Following is a relatively simple three step method for making digital negatives. With some of the more forgiving processes like gum and casein, only the first two steps may be necessary. The system is based on the Epson printer that uses Ultrachrome ink sets and comes with the Advanced Black & White System installed in the driver. The best transparency film substrates are made by Arista, Ink Press, or Pictorico; have some on hand. Capture the image in camera either RAW or TIFF at the largest file size possible. Also, keep or convert the image to 16 bit depth and Adobe RGB (1998) or its grayscale equivalent, gamma 2.2.
以下是製作數字底片的相對簡單的三步法。 對於一些更寬容的過程,如口香糖和酪蛋白,只需要前兩個步驟。 該系統基於Epson打印機,該打印機使用 Ultrachrome 墨水套件,並在驅動程序中安裝了高級黑白系統。 最好的透明薄膜基材由 Arista,Ink Press 或 Pictorico 製造; 有一些在手。 使用最大文件大小以 RAW 或 TIFF 在相機中捕獲圖像。 此外,保持或轉換圖像為 16位 深度和 Adobe RGB(1998)或其灰度等效,伽瑪2.2。
Three-step negative workflow
三步驟負片工作流程
1. Determine the Basic Exposure Time for the photo process to be used to give maximum black.
確定用於提供最大黑色的照片處理的基本曝光時間。
2. Determine overall negative contrast to match the contrast of the process and give “paper white.”
確定整體負片對比度以匹配過程的對比度並給出“紙白”。
3. Make midtone adjustments to match the response curve of the process.
進行中間調調整以匹配過程的響應曲線。
Download step wedge Photoshop file
(下載步驟楔形Photoshop文件)
Step 1: Determining basic exposure time
第1步:確定基本曝光時間
The aim is to determine the minimum UV exposure needed to obtain maximum black when printing through the transparency material on which the negative is printed.
目的是確定在通過印刷負片的透明材料印刷時獲得最大黑色所需的最小 UV 曝光。
1. Coat a half-sheet of paper with the light sensitive emulsion of choice.
用選擇的光敏乳液塗在半張紙上。
2. Place a sheet of transparency material on top to cover half of the paper.
在頂部放置一張透明材料以覆蓋紙張的一半。
3. Place a sheet of opaque material so it covers both halves and leaves a strip exposed at the top.
放置一片不透明材料,使其覆蓋兩半,並在頂部留下條帶。
4. Make an exposure (maybe one minute).
曝光(可能是一分鐘)。
5. Move the opaque material down to uncover another strip and make another exposure.
向下移動不透明材料以露出另一條帶並再次曝光。
6. Continue this process until there is a series of increasing exposures extending across the junction between transparency material and no material.
繼續這個過程,直到在透明材料和沒有材料之間的連接處延伸一系列增加的曝光。
7. Develop the test sheet and dry it. Notice that on strips that received short exposures the boundary between transparency material and none can easily be seen. The goal is to find the exposure where this boundary becomes invisible. This is the minimum exposure that is capable of giving maximum black through the transparency material (or some other hue, e.g. maximum blue with cyanotype). Once the Basic Exposure is determined for that process on that paper it does not change. If a final print turns out to be too light or dark, this is an indication of another problem in the workflow.
開發測試表並將其乾燥。 請注意,在接受短曝光的條帶上,可以很容易地看到透明材料和非透明材料之間的邊界。 目標是找到這個邊界變得不可見的曝光。 這是能夠通過透明材料(或一些其他色調,例如具有青色的最大藍色)給出最大黑色的最小曝光。 一旦在該紙上確定了該過程的基本曝光,它就不會改變。 如果最終打印結果太亮或太暗,則表明工作流程中存在另一個問題。
Step 2: Negative contrast
第2步:負片對比度
The second step in making a digital negative is to adjust the overall contrast of the negative to match the contrast range of the emulsion.
製作數位負片的第二步是調整底片的整體對比度以匹配乳液的對比度範圍。
For example, a palladium emulsion requires a negative with rather high contrast (more ink). A gum emulsion requires a negative with fairly low contrast (less ink).
例如,鈀乳液需要具有相當高對比度的負片(更多墨水)。 膠乳劑需要具有相當低對比度的負片(較少的墨水)。
The way this adjustment is done is by controlling the maximum amount of ink the printer lays down.
完成此調整的方法是控制打印機放下的最大墨水量。
There are two sliders that can be used to adjust the printer’s ink limit.
有兩個滑塊可用於調整打印機的墨水限制。
The first is in the Advanced Black & White dialog of the driver. It is called the Max OD slider (Figure D). Its default setting is 0 and we will leave it at that setting.
第一個是驅動程序的高級黑白對話框。 它被稱為Max OD滑塊(圖D)。 它的默認設置為 0,我們將其保留在該設置。
The second slider is called the Color Density slider (Figure D2) and it is found by clicking on Printer Settings (see Figure C) and opening the Advanced Media Control dialog. The Default setting for the Color Density slider is 0 and this yields a relatively low contrast negative suitable for gum or cyanotype. Moving the slider towards +50% yields higher contrast negatives suitable for palladium or salt prints. Here is the workflow to determine the correct negative contrast to match the photo process.
第二個滑塊稱為“顏色密度”滑塊(圖D2),單擊“打印機設置”(參見圖C)並打開“高級媒體控制”對話框即可找到它。 “顏色密度”滑塊的“默認”設置為0,這會產生相對較低的對比度負值,適用於口香糖或青色。 將滑塊移向+ 50%會產生更高的對比度負片,適合鈀或鹽印。 以下是確定與照片處理相匹配的正確負對比度的工作流程。
1. Download the free Step Tablet image file at alternativephotography.com. Open the file in Photoshop. An image of this step tablet is shown in Figure A.
在 alternativephotography.com 下載免費的 Step Tablet 圖像文件。 在 Photoshop 中打開文件。 該步驟平板電腦的圖像如圖A所示。
水平翻轉平板電腦圖像(圖像/圖像旋轉/水平翻轉),然後反轉為負片(圖像/調整/反轉)。 當在打印曝光期間將負片的墨水側放置在紙張的乳劑側時,翻轉圖像確保左手和右手保持正確。
3. The following instructions are specifically for a Mac computer running Photoshop CS6 with an Epson 4880 printer. However they also apply to CS5 and essentially any Epson printer that uses the Advanced B&W system.
以下說明專門針對運行帶有 Epson 4880 打印機的 Photoshop CS6 的 Mac 計算機。 但是它們也適用於 CS5 和基本上任何使用 Advanced B&W 系統的 Epson 打印機。
4. Go to File/Print. The dialog window that will open is shown in Figure B. In the dialog box:
轉到文件/打印。 將打開的對話框窗口如圖B所示。在對話框中:
選擇打印機,Epson Stylus 4880。
b. On the right side, under Color Management, check the button beside Document. Presumably it will say Profile Gray Gamma 2.2 since that is the profile that should have been embedded in the image file at the very start of this workflow. If it says anything else, go to the bottom, hit Cancel, bail out, go back and convert the image to gamma 2.2, and start the print process all over again (sob). If gamma 2.2 shows, go down to Color Handling and select Printer Manages Colors.
在右側的“顏色管理”下,選中“文檔”旁邊的按鈕。 據推測,它會說 Profile Grey Gamma 2.2,因為這是應該在此工作流程一開始就嵌入到圖像文件中的配置文件。 如果它說了什麼,請轉到底部,點擊取消,拯救,返回並將圖像轉換為 gamma 2.2,然後重新開始打印過程(嗚咽)。 如果顯示 gamma 2.2,請轉到“顏色處理”並選擇“打印機管理顏色”。
c. For Rendering Intent choose Perceptual (the default).
對於 Rendering Intent,選擇 Perceptual(默認值)。
d. Select either Landscape (horizontal) or Portrait (vertical) media orientation.
選擇橫向(水平)或縱向(垂直)介質方向。
e. Click on Print Settings. Another window will open (Figure C).
單擊“打印設置”。 另一個窗口將打開(圖C)。
選擇紙張尺寸(8½“x11”)。
g. Click on Layout and scroll down to Printer Settings.
單擊佈局並向下滾動到打印機設置。
h. Choose Paper Source (usually the paper tray).
選擇紙張來源(通常是紙盤)。
i. Choose Media Type: Premium Luster Photo Paper. This choice tells the printer to print with Photo Black Ink (as opposed to Matte Black Ink). Photo Black ink is a weaker UV absorber than Matte Black but it is strong enough for most processes.
選擇介質類型:高級光澤相紙。 此選項告訴打印機使用 Photo Black Ink(與 Matte Black Ink 相反)進行打印。 照片黑色墨水是一種比啞光黑色更弱的紫外線吸收劑,但它對大多數工藝來說足夠強大。
j. Under Print Mode select Advanced Black & White.
在打印模式下,選擇高級黑白。
k. Color toning, leave it at neutral.
色調,讓它保持中立。
l. Output Resolution. Set at the maximum of 2880 dpi. This is important for obtaining the highest quality negatives.
輸出分辨率。 最大設置為 2880 dpi。 這對於獲得最高質量的底片非常重要。
m. Turn OFF High Speed.
關閉高速。
5. With all these settings entered, go back up to the middle of the window and click on Advanced Color Settings. A window will open with an image of a blond woman off to one side and a bunch of various sliders (Figure D). Only change one thing in this window:
輸入所有這些設置後,返回到窗口中間並單擊“高級顏色設置”。 將打開一個窗口,其中一個金發女人的圖像偏向一側,一堆各種滑塊(圖D)。 只在此窗口中更改一件事:
在彩色圓圈附近是一個標記為垂直的框。 在此框中鍵入數字75。 此操作會導致打印機將最大量的黃色墨水投入圖像。 黃色是 Photo Black 之後最強的紫外線吸收劑。 增加黃色使紫外線更密集,負面更具對比度。 點擊 SAVE。
6. Now go back to Print Settings, click on Layout, and on the drop down menu select Advanced Media Control. Move the Color Density slider to set the contrast of the negative (Figure D2). The default position of 0 is about right for gum and cyanotype while higher settings, in the +30-40% range, are needed for palladium or salt. Hit SAVE.
現在返回打印設置,單擊佈局,然後在下拉菜單中選擇高級媒體控制。 移動“顏色濃度”滑塊以設置負片的對比度(圖D2)。 0 的默認位置對於口香糖和青色是正確的,而對於鈀或鹽需要在 + 30-40% 範圍內的較高設置。 點擊 SAVE。
將一張透明材料滑入紙盒,點擊“打印”,然後製作底片。 如果要立即使用負片,請使用吹風機吹乾負片一兩分鐘以消除所有乳狀。
8. Take the printed step tablet negative and use it to expose a sheet of paper coated with the photo emulsion, using the Basic Exposure Time determined in Step 1.
取印刷的 step tablet 負片並使用它來曝光塗有光乳劑的紙張,使用步驟1中確定的基本曝光時間。
When making the exposure, lay a small piece of opaque plastic so it slightly overlaps the 0% patches of the negative. Process and dry the step tablet print.進行曝光時,放置一小塊不透明塑料,使其略微重疊 0% 負片的補丁。處理並乾燥步驟平板打印。
The dark, 100% patches of the print should be as black as the process can manage since that is controlled by the Basic Exposure.
黑暗的 100% 打印件應該像過程可以管理的那樣黑,因為它是由基本曝光控制的。
Now look at the area under the opaque plastic. This area has been coated by emulsion chemistry but has received no exposure. This reference area is the lightest tone obtainable with this particular emulsion. If the correct negative contrast setting has been chosen (Color Density slider, remember?) the lightest, 0% patches of the print will be very close in tone to the tone of the reference area.
現在看看不透明塑料下面的區域。該區域已經通過乳液化學塗覆,但沒有暴露。該參考區域是用這種特定乳液可獲得的最輕的色調。如果選擇了正確的負對比度設置(色彩濃度滑塊,請記住嗎?),最淺,0%的打印色塊將與參考區域的色調非常接近。
If the 0% patch is noticeably grayer than the reference area, it is necessary to go through the process again but this time move the Color Density slider to the right a bit to increase contrast. On the other hand, if several of the lightest steps look as white as the reference area, contrast is too high and it is necessary to move the slider to the left.
如果0%貼片明顯比參考區域更粗,則需要再次完成該過程,但這次將顏色密度滑塊向右移動一點以增加對比度。另一方面,如果最輕的幾個步驟看起來像參考區域一樣白,則對比度太高,需要將滑塊向左移動。
To streamline this process, make a series of step tablet negatives, one with the Color Density slider set at 0, another at +10%, 20%, 30%, and 40%. These varying contrasts will probably cover the entire range needed for most photo processes. When calibrating a new process, print a few and quickly determine which contrast setting will be necessary.
要簡化此過程,請製作一系列步驟平板電腦底片,其中一個顏色密度滑塊設置為0,另一個設置為+ 10%,20%,30%和40%。這些不同的對比可能會涵蓋大多數照片處理所需的整個範圍。校準新過程時,打印一些并快速確定需要哪種對比度設置。
Step 2a: Advance media control
步驟2a:提前媒體控制
Another option for controlling negative contrast is to choose Enhanced Matte Paper as the Media option (instead of Luster Photo Paper).
控制負對比度的另一個選項是選擇增強遮罩紙作為介質選項(而不是Lustre Photo Paper)。
This choice will force the printer to use Matte Black ink which is a stronger UV absorber than Photo Black ink.
此選擇將迫使打印機使用啞光黑色墨水,這是一種比Photo Black墨水更強的紫外線吸收劑。
When using Matte Black ink the Color Density slider is no longer needed. The entire range of contrasts needed for most photo processes can be obtained by changing the Max OD slider (in the Advanced Black and White dialog) from – 12 (low contrast) to 0 (very high contrast).
使用啞光黑色墨水時,不再需要“顏色密度”滑塊。 通過將最大OD滑塊(在高級黑白對話框中)從-12(低對比度)更改為0(非常高的對比度),可以獲得大多數照片處理所需的整個對比度範圍。
Both Photo Black and Matte Black ink will produce good negatives. There is the option to use either one in case switching ink types is not desired. If making negatives for gum, casein, or cyanotype, use Photo Black ink and leave both sliders at their default positions.
Photo Black和Matte Black墨水都會產生很好的底片。 如果不需要切換墨水類型,可以選擇使用其中任何一種。 如果對口香糖,酪蛋白或冷色調產生負面影響,請使用Photo Black墨水並將兩個滑塊保留在默認位置。
Step 3: Midtone adjustments
第3步:中間調調整
To adjust image mid-tones a positive print of the step tablet shown in Figure A will be made, using a digital negative with its contrast adjusted for this particular photo process. This print is then measured to find out how far off the mid-tones may be, and with this information a correction curve is constructed to bring the midtones back into perfect linearity. Once constructed, this correction curve will be applied to the positive image file.
為了調整圖像中間色調,將使用數字負片製作圖A中所示的階梯片的正片,其對比度針對該特定照片處理進行調整。 然後測量該印刷品以找出中間色調可能有多遠,並且利用該信息構造校正曲線以使中間色調恢復到完美的線性。 構建後,該校正曲線將應用於正圖像文件。
1. Print a digital negative of the step tablet. Flip the image horizontally, invert to negative, and print it on transparency material using the described printer driver settings, including the Color Density slider setting that gives the correct overall negative contrast for the photo process.
打印步驟平板電腦的數字負片。 水平翻轉圖像,反轉為負片,然後使用所述的打印機驅動程序設置將其打印在透明膠片材料上,包括“色彩濃度”滑塊設置,該設置可為照片處理提供正確的整體負片對比度。
2. Expose this tablet negative to the photo emulsion using the Basic Exposure Time previously established.
使用之前建立的基本曝光時間將此片劑陰性曝光於照片乳劑。
3. When making the exposure, be sure to place a small piece of opaque plastic to slightly overlap the lightest patches of the tablet (the 0% patches).
進行曝光時,請務必放置一小塊不透明塑料,使其與平板電腦最輕的貼片(0%貼片)略微重疊。
4. Process and dry the tablet print.
處理並乾燥平板電腦打印。
5. Scan the tablet print using a flatbed scanner set to Reflectance Mode. In the dialog box (Figure E) click on the General tab and under Original choose Reflective.
使用設置為反射模式的平板掃描儀掃描平板電腦打印件。 在對話框(圖E)中,單擊“常規”選項卡,然後在“原始”下選擇“反射”。
接下來,單擊Frame選項卡(圖F)。
掃描類型。 選擇16/8位灰度(這是他們說掃描將在8位深度的方式)。
b. Set the resolution slider to 180dpi (low resolution is fine).
將分辨率滑塊設置為180dpi(低分辨率很好)。
7. Hit the Prescan button. The scanner will make a very low resolution scan of the entire glass. Move the guidelines to limit the final scan to just the step tablet.
點擊預掃描按鈕。 掃描儀將對整個玻璃進行非常低分辨率的掃描。 移動指南以將最終掃描限制為步驟平板電腦。
8. Now go up and hit the histogram button at the top (third button from the left). This will open up a histogram of the step tablet prescan (Figure G). Move the shadow and highlight sliders so they are just outside of all the pixels (the dark stuff). Make sure the middle slider remains at 0. This will ensure that the scanner records all the information seen by the photo receptors and does not clip either the shadows or the highlights. Now go back to the main dialog box and hit Scan.
現在上去並點擊頂部的直方圖按鈕(左起第三個按鈕)。 這將打開步驟片劑預掃描的直方圖(圖G)。 移動陰影並突出顯示滑塊,使它們位於所有像素之外(黑暗的東西)。 確保中間滑塊保持為0.這將確保掃描儀記錄光接收器看到的所有信息,並且不會剪切陰影或高光。 現在返回主對話框並單擊“掃描”。
平板電腦打印的掃描圖像應在Photoshop中打開。 對此圖片執行以下操作:
10. In Photoshop, go to the Windows menu, scroll down, and click on Info. The Info palette will open. In the upper right corner click on a small stack of lines that open the Panel Options window. For the First Color Readout select Grayscale. Close Panel Options but leave the Info Palette open. Now go to the Tool Bar, select the Eyedropper tool and in the tool options bar set the Eyedropper to measure an 11×11 pixel area (this further evens out the readings).
在Photoshop中,轉到Windows菜單,向下滾動,然後單擊“信息”。 信息面板將打開。 在右上角,單擊打開“面板選項”窗口的一小摞行。 對於First Color Readout,選擇灰度。 關閉面板選項,但打開Info Palette。 現在轉到工具欄,選擇吸管工具,在工具選項欄中設置吸管以測量11×11像素區域(這進一步均衡了讀數)。
11. Take a sheet of paper and write two column headings on it, Input and Output. Values in the Input column will be taken from the numbers written on individual steps of the step tablet.
拿一張紙,在上面寫上兩個列標題,輸入和輸出。 “輸入”列中的值將取自步驟平板電腦各個步驟上寫入的數字。
Values in the Output column will be numbers read from the adjusted scan image of the step tablet print, measured with the Eyedropper tool.
“輸出”列中的值將是從步進平板打印的調整後掃描圖像中讀取的數字,使用吸管工具測量。
If the contrast selected via the Color Density slider for the step tablet negative is nearly correct the first number pair may read Input 0, Output 1. It is nearly impossible to get the Output from the 0% step to actually read 0 without also raising contrast too high and clipping some of the high values.
如果通過步驟平板電腦負片的顏色密度滑塊選擇的對比度幾乎是正確的,則第一個數字對可以讀取輸入0,輸出1.幾乎不可能將輸出從0%步驟實際讀取為0而不提高對比度太高,削減一些高價值。
So I usually accept an Output reading of 1% as just fine. Hopefully the Output reading from the 5% step will be above 1% (5% would be perfect). I find it useful to make readings in 5% intervals up to 30%, every 10% from then on, and finally at 90%, 95%, and 100%.
所以我通常接受1%的輸出讀數就好了。希望5%步驟的輸出讀數將高於1%(5%將是完美的)。我發現以5%的間隔讀數達到30%,從那時起每10%,最後達到90%,95%和100%是有用的。
When done there will be two columns of paired numbers that will look something like Figure H. These number pairs describe a curve that shows how the image goes from pure white to pure black. On the original step tablet file Input equaled Output which means the midtones are linear.
完成後,會有兩列配對數字看起來像圖H.這些數字對描述的曲線顯示圖像如何從純白色變為純黑色。在原始步驟平板文件輸入等於輸出,這意味著中間調是線性的。
On the scanned step tablet print Input will almost never be the same as Output since most photo emulsions respond to UV light in a nonlinear, S-shaped fashion. The number pairs in the Input/Output table just created will correct this situation and completely linearize print midtones for this particular photo process.
在掃描步驟平板打印輸入幾乎不會與輸出相同,因為大多數光乳液以非線性S形方式響應UV光。剛剛創建的輸入/輸出表中的數字對將糾正這種情況,並完全線性化此特定照片過程的打印中間調。

12. It is easy to make a correction curve from the number pairs in the Input/Output table (that is what all computer guys say just before pushing you into the deep end of the pool). Go to the top of the table, cross out Input and relabel it Output (this operation is shown in Figure H). Likewise, cross out Output and relabel it Input. Voilà! These are the number pairs needed to construct the correction curve.
可以很容易地從輸入/輸出表中的數字對進行校正曲線(這是所有計算機人員在將您推入池的深層之前所說的)。 轉到表格的頂部,劃掉輸入並重新標記輸出(此操作如圖H所示)。 同樣,交叉輸出並重新標記輸入。瞧! 這些是構建校正曲線所需的數字對。
13. To use these number pairs, open any image file in Photoshop in order to access the Curves dialog box (with an image file open, go to Image/Adjustments/Curves).
要使用這些數字對,請在Photoshop中打開任何圖像文件以訪問“曲線”對話框(打開圖像文件,轉到“圖像/調整/曲線”)。
14. Toward the bottom of the dialog box, click on the button beside Pigment/Ink%. Now, go up to the diagonal line in the Curves box and click anywhere on the line to place an active point (this is shown in Figure I). When this is done two more boxes will appear, labeled Input and Output.
在對話框底部,單擊Pigment / Ink%旁邊的按鈕。 現在,轉到“曲線”框中的對角線,然後單擊該行上的任意位置以放置一個活動點(如圖I所示)。 完成此操作後,將出現另外兩個框,標記為輸入和輸出。
15. Go to the Input/Output numbers (relabeled to describe a correction curve) and type in the first pair of numbers. The active point will move to the correct position.
轉到輸入/輸出數字(重新標記以描述校正曲線)並輸入第一對數字。 活動點將移動到正確的位置。
16. Now add another active point, above the first point, and type in the next number pair. And so forth until all points for the entire correction curve have been added. Note: Photoshop only allows 16 points on the curve, so choose points where they really seem needed to define the curve (in the middle not so many points are needed). And Photoshop will not insert points that are less than 2% apart, so choose further spaced points. Remember that the real correction curve never dips down (it will always ascend) and will not have jagged dips and rises. It is quite acceptable to look at the finished curve and manually correct it to a smooth, reasonable curve.
現在在第一個點上方添加另一個活動點,然後鍵入下一個數字對。 等等,直到添加了整個校正曲線的所有點。 注意:Photoshop只允許曲線上有16個點,因此選擇它們確實需要的點來定義曲線(中間不需要那麼多點)。 Photoshop不會插入間距小於2%的點,因此請選擇更多的間隔點。 請記住,真正的修正曲線永遠不會下降(它總是會上升)並且不會出現鋸齒狀的下降和上升。 查看完成的曲線並手動將其校正為平滑合理的曲線是完全可以接受的。
17. Once the curve is constructed, click on the stacked lines in the upper right corner and choose Save Preset. Name the curve and choose a place to save it. A good suggestion is to make one folder to house all curves.
構建曲線後,單擊右上角的堆疊線條,然後選擇“保存預設”。 命名曲線並選擇要保存的位置。 一個好的建議是製作一個文件夾來容納所有曲線。
Final notes to this 3-step system
這個3步系統的最後註釋
It is not necessary to go through all three steps every time. Step 1 is necessary to establish a Basic Exposure Time. It is almost always necessary to go through Step 2 and adjust the contrast of the image. Step 3 may not be needed. For several processes that utilize a low contrast negative (ie, gum, casein, cyanotype) quite acceptable results can be obtained by just going through Steps 1 & 2 and skipping Step 3. Try it and see. However, for processes that need a higher contrast negative (examples are platinum/palladium, salt, and ziatype) without a midtone correction curve shadows will be much too dark and blocked up while highlights will be washed out.
沒有必要每次都經歷所有三個步驟。 建立基本曝光時間需要步驟1。 幾乎總是需要通過步驟2並調整圖像的對比度。 可能不需要步驟3。 對於使用低對比度陰性(即口香糖,酪蛋白,青色型)的幾種方法,只需通過步驟1和2並跳過步驟3即可獲得完全可接受的結果。試試看。 然而,對於需要較高對比度負片(例如鉑/鈀,鹽和ziatype)而沒有中間調校正曲線的過程,陰影將太暗並且被遮擋而高光將被沖洗掉。
Monochrome digital negative
單色數位負片
1. If the image is in color, convert it to black and white. The most flexible way to do this is to go to Image/Adjustments/Black&White. Play with the sliders until the desired look is achieved and click OK.
如果圖像是彩色的,請將其轉換為黑白圖像。 最靈活的方法是轉到圖像/調整/黑白。 使用滑塊播放,直到獲得所需的外觀,然後單擊“確定”。
2. Even though the image is now monochrome, it is still in RGB mode. Go to Image/Mode and select Grayscale.
即使圖像現在是單色的,它仍處於RGB模式。 轉到圖像/模式並選擇灰度。
3. Be sure the image has gamma 2.2 embedded in it (the grayscale equivalent of Adobe RGB (1998)). Go to Edit/Convert to Profile (NOT Assign Profile) and choose Grey gamma 2.2 as the destination space. If, eventually, Step 3 of this digital negative workflow is done, the digital step tablet has gamma 2.2 embedded in it. It is important to be consistent and have the same profile embedded both in the image file and in the step tablet used to calibrate the overall process. Flatten the image if it is not already (Layer/Flatten Image).
確保圖像中嵌入了gamma 2.2(相當於Adobe RGB(1998)的灰度等級)。 轉到編輯/轉換為配置文件(NOT Assign Profile)並選擇Gray gamma 2.2作為目標空間。 如果最終完成此數字負片工作流程的第3步,則數字步驟平板電腦中嵌入了gamma 2.2。 重要的是要保持一致並在圖像文件和用於校準整個過程的步驟平板電腦中嵌入相同的配置文件。 如果圖像尚未展平(圖層/展平圖像),則展平圖像。
4. Apply a Correction Curve to the positive image that was derived from Step 3 of the Digital Negative Workflow. This will be done only if Step 3 has been found to be necessary. First open the Curves dialog box (Image/Adjust/Curves). Click on the upper right stacked lines and choose Load Preset. A window will open. Find where the correction curve is stored and click on it to open and hit OK in the Curves window. The correction curve will be applied to the positive image file and the Curves window will close (the image file will also start to look rather weird because the correction curve distorts it).
將校正曲線應用於從數字負片工作流程的步驟3派生的正片圖像。 只有在發現步驟3是必要的時候才會這樣做。 首先打開“曲線”對話框(“圖像/調整/曲線”)。 單擊右上角的堆疊線條,然後選擇“加載預設”。 窗口將打開。 找到存儲校正曲線的位置,然後單擊它以打開並在“曲線”窗口中單擊“確定”。 校正曲線將應用於正圖像文件,曲線窗口將關閉(圖像文件也將開始看起來相當奇怪,因為校正曲線扭曲了它)。
5. Go to Image/Image Size. Set resolution to 360 ppi and size the image to the final print size.
轉到圖像/圖像大小。 將分辨率設置為360 ppi,並將圖像調整為最終打印尺寸。
6. Invert to negative (Image/Adjustments/Invert) being sure to invert the image layer and not the curve layer. The image should now only have two layers, the image itself and the curve layer.
反轉為負(圖像/調整/反轉),確保反轉圖像層而不是曲線層。 圖像現在應該只有兩層,圖像本身和曲線層。
7. Flip the image horizontally (Image/Image Rotation/Flip Horizontal) Flipping the image ensures that left and right handedness will remain correct when the ink side of the negative is placed against the emulsion side of the paper during print exposure. Now the image is ready to print.
水平翻轉圖像(圖像/圖像旋轉/水平翻轉)在打印曝光期間,當負片的墨水側面靠著紙張的乳劑側放置時,翻轉圖像可確保左右手的均勻性保持正確。 現在圖像已準備好打印。
8. Print out a negative using all the printer settings previously described, including the correct Color Density contrast setting.
使用前面描述的所有打印機設置打印出底片,包括正確的色彩濃度對比度設置。
Tricolor RGB negatives
三色RGB底片
1. Start with a color digital image that has been edited and is in Adobe RGB (1998) and 16 bit depth.
從已編輯的彩色數字圖像開始,採用Adobe RGB(1998)和16位深度。
2. Flatten the image to a single layer, then size it to 360ppi and the correct dimensions.
將圖像展平為單個圖層,然後將其調整為360ppi並選擇正確的尺寸。
3. Invert the sized image to negative (Image/Adjustments/Invert).
將尺寸圖像反轉為負值(圖像/調整/反轉)。
4. Save at this step since the next step cannot be undone.
保存在此步驟,因為下一步無法撤消。
5. Go to Window/Channels. This will open the Channels panel. In the upper right corner, click on the small stack of lines to open the Channel Options window. Scroll down and select Split Channels. This will cause the color image to disappear and be replaced by three grayscale images, one for the Red, one for the Green, and one for the Blue channel.
轉到窗口/頻道。 這將打開“頻道”面板。 在右上角,單擊一小堆線以打開“通道選項”窗口。 向下滾動並選擇“拆分頻道”。 這將導致彩色圖像消失並被三個灰度圖像替換,一個用於紅色,一個用於綠色,一個用於藍色通道。
6. Rename the Red separation as imagename_BLUEneg.psd, the Green separation as imagename_MAGENTAneg.psd, and the Blue separation as imagename_YELLOWneg.psd. Make a practice of also marking each negative as it comes out of the printer as Blue, Magenta, or Yellow since they look nearly identical.
將紅色分隔重命名為imagename_BLUEneg.psd,將綠色分隔重命名為imagename_MAGENTAneg.psd,將藍色分隔重命名為imagename_YELLOWneg.psd。 從打印機發出的每個底片都是藍色,洋紅色或黃色,因為它們看起來幾乎完全相同,所以也做一個練習。
7. Be sure that each negative file has Gray gamma 2.2 embedded in it (Edit/Convert to Profile/Select Gray Gamma 2.2 as the Destination Space).
確保每個負片文件都嵌入了Gray gamma 2.2(編輯/轉換為配置文件/選擇灰色Gamma 2.2作為目標空間)。
8. At this point there are two options. If the correct negative contrast has already been determined the negatives can be printed in the gum layer of choice at the Basic Exposure Time determined in Step 1 of the 3-step method and the Printer Settings determined in Step 2, including the correct Color Density setting for contrast.
此時有兩種選擇。 如果已經確定了正確的負對比度,則可以在3步法的步驟1中確定的基本曝光時間和步驟2中確定的打印機設置中,在所選的膠基層中打印底片,包括正確的色彩濃度設置 對比。
9. On the other hand if more fine-tuning of the midtones is necessary, a midtone correction curve as described in Step 3 will be necessary, but when applied to the RGB separations, it must be applied to the positive. Since at this point the RGB splits are negative, it is necessary to invert each file back to positive, apply the correction curve, then re-invert to negative. Be sure to invert the image, not the curve. Print the corrected negative using the Exposure and Printer Settings determined in Steps One and Two.
另一方面,如果需要對中間調進行更多微調,則需要如步驟3中所述的中間調校正曲線,但是當應用於RGB分色時,必須將其應用於正片。 由於此時RGB分裂為負,因此需要將每個文件反轉為正,應用校正曲線,然後重新反轉為負。 務必反轉圖像,而不是曲線。 使用步驟一和步驟2中確定的曝光和打印機設置打印校正後的負片。
Troubleshooting:
故障排除:
Can’t see the print options shown in figure B? No worries, newer mac operating systems have loaded an air print driver in your system, restricting access to certain options. To regain access, follow these steps: From System Preferences, select Printers and Scanners. Delete your printer. Now click Add Printer or Scanner. Click the + sign in the lower left corner. A box will pop up with printer names. From the list, select your printer. Under NAME: the name of the printer will appear. Under USE: you will see Secure Airprint. From that drop down, select your printer name. Close the box. You are now set.
看不到圖B所示的打印選項? 不用擔心,較新的Mac操作系統在您的系統中加載了空氣打印驅動程序,限制了對某些選項的訪問。 要重新獲得訪問權限,請執行以下步驟:從“系統偏好設置”中,選擇“打印機和掃描儀” 刪除您的打印機。 現在單擊添加打印機或掃描儀。 單擊左下角的+號。 將彈出一個包含打印機名稱的框。 從列表中選擇您的打印機。 在NAME下:將顯示打印機的名稱。 在USE下:您將看到Secure Airprint。 從該下拉列表中,選擇您的打印機名稱。 關上盒子。 你現在好了。
---------------------------------------------------------------------------


留言
張貼留言