Creating the Step Wedge for Curve Corrections
since: 2019/01/19
update: 2019/01/20
reference:
1. CreativeLive: Free Live Online Classes
2. Introduction to Alternative Processing in Photography
3. CreativeLive Classes

---------------------------------------------------------------------------
前置作業: Photoshop 顏色設定(二選一)

(建議) Adobe RGB (1998)

或: ProPhoto RGB

---------------------------------------------------------------------------
A. Create a seven by eight inch document
step 1: create new file

step 2: create a seven by eight inch document

step 3: bring up your info palette (F8 key)

step 4: Choose the grayscale:
That's gonna turn to a K value or a K percent. That's the percent of black ink.

step 5: Integrated into the panel

---------------------------------------------------------------------------
B. Create 50-step wedge
new method:
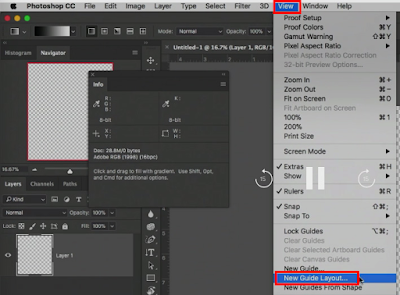
step 1: view menu > choose a new guide layout.
step 2:

step 3:

step 4: 之後, 新增時, 就可以載入使用.

old method:
step 1: 偏好設定 > 一般

step 2: 將尺標單位改成: 英吋

step 3: 檢視 > 尺標

step 4: 從尺標水平與垂直處拉出導引線

---------------------------------------------------------------------------
C. 繪製格線
step 1: 選取鉛筆工具

step 1: 設定尺寸與硬度

step 1: 繪製: Click, Shift key, click and release.

step 4: 水平與垂直皆完成

---------------------------------------------------------------------------
D. 填入亮度值(Brightness)
step 1: 選取魔術棒工具
備註: 如果之前的步驟正確的話,魔術棒工具將完美地選擇該盒子內的方塊。

step 2: 編輯 > 填滿

step 3: 內容使用, 選擇: 顏色

step 4: 將亮度 B(Brightness) 設為 100%

step 5: 結果

step 6: 同樣的方式, 將亮度 B 遞減 2%

step 7: 結果

step 8: 都完成後, 選取 > 取消選取 (魔術棒工具)

step 9: 利用資訊視窗來檢查 K (灰度)值

---------------------------------------------------------------------------
E. 標記數值
step 1: 選取水平文字工具

step 2: 設定文字樣式

step 3: 輸入完成後, 檢視 > 清除參考線
備註: 數字 0 ~ 50 用黑色, 52 ~ 100 用白色.

step 4: 結果

---------------------------------------------------------------------------
F. 反轉調整層
step 1: 使用負片效果來反轉調整層

step 2: 結果

---------------------------------------------------------------------------
G. 新增另一個 step wedges
step 1: 檔案 > 開新檔案

step 2: 新增如下的檔案

step 3: Command + A (Mac) 選取整個文件, 然後點選漸層工具

step 4: 點選預設集: 黑, 白

step 5: 將平滑度調整至 0%

step 6: 將滑鼠從下往上拖曳並放開

step 7: 結果

---------------------------------------------------------------------------
H. 色調分離
step 1: 影像 > 調整 > 色調分離

step 2: 色階: 11

step 3: 選取 > 取消選取

step 4: 利用資訊(info)視窗來確認灰度值

---------------------------------------------------------------------------
I. 加入文字標籤
step 1: 點選水平文字工具, 設定樣式

step 2: 輸入後結果
說明: 0% ~ 40% 為黑色字體, 50% ~ 100% 為白色字體.

step 3: 合併圖層

---------------------------------------------------------------------------
J. 加入文字標籤
step 1: 將在 Lightroom 中的照片, 開啟為 Photoshop 的智慧型物件

step 2: 點選 V 鍵(切換為選取工具), 然後用滑鼠拖曳到剛剛開啟的智慧物件裡
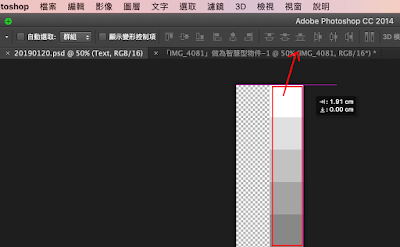
step 3: 按下 Command + T (Mac) 後, 用滑鼠來調整大小

備註:
1. 一般而言, 剛開始會使用 21-step wedge.
2. 之後習慣後, 可以改成使用 11-step wedge.
3. 50-step wedge 通常使用在校準映射曲線.
4. 21-step wedge 也可以幫助你對現有的曲線進行稍微的調整.
update: 2019/01/20
reference:
1. CreativeLive: Free Live Online Classes
2. Introduction to Alternative Processing in Photography
3. CreativeLive Classes

前置作業: Photoshop 顏色設定(二選一)
(建議) Adobe RGB (1998)

或: ProPhoto RGB

A. Create a seven by eight inch document
step 1: create new file
step 2: create a seven by eight inch document

step 3: bring up your info palette (F8 key)

step 4: Choose the grayscale:
That's gonna turn to a K value or a K percent. That's the percent of black ink.

step 5: Integrated into the panel
---------------------------------------------------------------------------
new method:
step 1: view menu > choose a new guide layout.

step 2:


step 4: 之後, 新增時, 就可以載入使用.

old method:
step 1: 偏好設定 > 一般

step 2: 將尺標單位改成: 英吋

step 3: 檢視 > 尺標

step 4: 從尺標水平與垂直處拉出導引線

C. 繪製格線
step 1: 選取鉛筆工具

step 1: 設定尺寸與硬度

step 1: 繪製: Click, Shift key, click and release.

step 4: 水平與垂直皆完成

D. 填入亮度值(Brightness)
step 1: 選取魔術棒工具
備註: 如果之前的步驟正確的話,魔術棒工具將完美地選擇該盒子內的方塊。
step 2: 編輯 > 填滿

step 3: 內容使用, 選擇: 顏色
step 4: 將亮度 B(Brightness) 設為 100%

step 5: 結果

step 6: 同樣的方式, 將亮度 B 遞減 2%

step 7: 結果

step 8: 都完成後, 選取 > 取消選取 (魔術棒工具)

step 9: 利用資訊視窗來檢查 K (灰度)值

E. 標記數值
step 1: 選取水平文字工具

step 2: 設定文字樣式

step 3: 輸入完成後, 檢視 > 清除參考線
備註: 數字 0 ~ 50 用黑色, 52 ~ 100 用白色.

step 4: 結果

F. 反轉調整層
step 1: 使用負片效果來反轉調整層

step 2: 結果

G. 新增另一個 step wedges
step 1: 檔案 > 開新檔案

step 2: 新增如下的檔案

step 3: Command + A (Mac) 選取整個文件, 然後點選漸層工具

step 4: 點選預設集: 黑, 白

step 5: 將平滑度調整至 0%

step 6: 將滑鼠從下往上拖曳並放開

step 7: 結果

H. 色調分離
step 1: 影像 > 調整 > 色調分離

step 2: 色階: 11

step 3: 選取 > 取消選取

step 4: 利用資訊(info)視窗來確認灰度值

I. 加入文字標籤
step 1: 點選水平文字工具, 設定樣式

step 2: 輸入後結果
說明: 0% ~ 40% 為黑色字體, 50% ~ 100% 為白色字體.

step 3: 合併圖層

J. 加入文字標籤
step 1: 將在 Lightroom 中的照片, 開啟為 Photoshop 的智慧型物件

step 2: 點選 V 鍵(切換為選取工具), 然後用滑鼠拖曳到剛剛開啟的智慧物件裡

step 3: 按下 Command + T (Mac) 後, 用滑鼠來調整大小

1. 一般而言, 剛開始會使用 21-step wedge.
2. 之後習慣後, 可以改成使用 11-step wedge.
3. 50-step wedge 通常使用在校準映射曲線.
4. 21-step wedge 也可以幫助你對現有的曲線進行稍微的調整.


留言
張貼留言