Coating Process and Cyanotype Chemistry
since: 2019/03/24
update: 2019/03/24
reference:
1. Black and White Ink Products & Software - Piezography
2. QuadToneRIP Overview
3. CreativeLive: Free Live Online Classes
4. Introduction to Alternative Processing in Photography
5. CreativeLive Classes
6. Creating the Step Wedge for Curve Corrections
7. Organizing Your Photoshop Files and Curves
8. Setting Up the Printer
9. Setting the Maximum Black Time
10. Getting the Initial Curve Test Numbers
11. Correcting the Curve
12. Printing the Curve
13. Sharing Curves
14. Paper and Brush Types
15. UV Light Box
16. 8x10" Contact Print Frame
---------------------------------------------------------------------------
---------------------------------------------------------------------------
A. 紫外線曝光機(UV Light Box)
參考: UV Light Box
We're in the 320 to 400 nanometer wavelength, medium length ultraviolet light. It's a consistent source of light for us.
我們的波長在 320 到 400 納米,中等長度的紫外線。 這對我們來說是一致的光源。

---------------------------------------------------------------------------
B. 放置數位負片
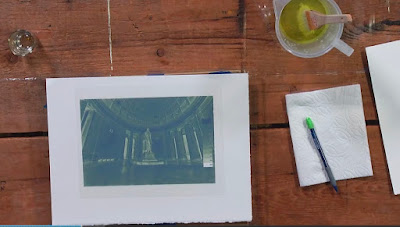
you can see I've got the image just a little bit higher on the piece of paper, than the bottom. That actually creates the optical illusion of it being centered. If it's got a little bit of weight to the bottom, our eye just believes it's gonna be a little bit higher, and I kinda ballpark center of left to right.
你可以看到我的紙張上的圖像比底部高一點。 這實際上創造了它居中的視錯覺。 如果它的底部有一點重量,我們的目光只會相信它會更高一些,而且我從左到右都是一個棒球場中心。
---------------------------------------------------------------------------
C. 塗抹位置標記
Then what I'm going to do, is take my pencil and I'm just gonna make a little tick mark kind of at the edges of where my coating area is. And this just is at the edge of the negative and it allows me to know where the negative is so that I know where to start and stop the coating process. I don't worry about it being super exact because I'm gonna go outside the lines as I coat. Now I've got my little tick marks where the coating's gonna be.
然後,我要做的就是帶上我的鉛筆,我只是在塗層區域的邊緣做一點刻痕。 而這只是在負面的邊緣,它讓我知道負面的位置,以便我知道從哪裡開始和停止塗層過程。 我不擔心它是非常精確的,因為我會穿著外面的線條。 現在我的塗層就會出現小刻痕。


---------------------------------------------------------------------------
D. 化學藥劑
If we look at the chemistry for cyanotypes, we have two: we have a part A and a part B. It's a ferric ammonium citrate and it's potassium ferrous cyanide, are the two chemicals together that make up a cyanotype solution. What happens is, when the two chemicals mix together, and they're exposed to UV light, the ferric ammonium citrate, green, actually becomes a ferrous metal.
如果我們看一下氰化型的化學反應,我們有兩個:我們有A部分和B部分。它是檸檬酸鐵銨和氰化亞鐵鉀,它們是組成一種氰化物溶液的兩種化學物質。 當兩種化學物質混合在一起,並且它們暴露在紫外線下時,會發生檸檬酸鐵銨,實際上變成黑色金屬。
So that's what stays as the residual metal in the print that gives us the ultimate look of the cyanotype. It's also the interaction with the potassium cyanide which gives it the blue color. We need those two together to actually create the chemical reaction when it's exposed to ultraviolet light. The cool part about a cyanotype is it's not hyper-sensitive to ultraviolet light, so you can actually coat under pretty normal lighting conditions. A 40 watt, 60 watt tungsten bulb, which is like a normal household bulb, you could easily coat under that with no real impact. Fluorescent bulbs will have a little bit of UV light in them and could cause an impact.
這就是印刷品中殘留金屬的含量,它為我們提供了最佳的冷色調外觀。 它也是與氰化鉀的相互作用,使其呈現藍色。 當暴露在紫外線下時,我們需要這兩者一起實際產生化學反應。 關於冷色調的冷卻部分是它對紫外線不敏感,所以你可以在非常正常的光照條件下進行塗層。 一個40瓦,60瓦的鎢燈泡,就像一個普通的家用燈泡,你可以很容易地在它下面塗上,沒有真正的影響。 熒光燈泡中會有一點紫外線,可能會產生影響。
This is a very light, even touch. We don't want the chemistry to get onto the sides of the brush. We want it to stay down on to the tips of the brush. It's mostly an arm movement. It's not wrist motion, it's an arm motion. It takes practice.
這是一種非常輕盈,均勻的觸感。 我們不希望化學物質進入刷子的兩側。 我們希望它能夠深入了解畫筆的提示。 它主要是手臂運動。 這不是手腕運動,而是手臂運動。 這需要練習。
What you're gonna do is, we're gonna pour that chemistry kind of in the middle of the paper. And then we're gonna take our brush, and we're gonna slowly go back and forth in a very consistent, but very light pattern. Then we're gonna switch and go up and down. You can start to see where those brush strokes would come from, as the brush hits the end and I pick it back up and I come back down. What I'm doing is trying to move the chemistry along so that it'll be absorbed into the paper.
你要做的是,我們將把這種化學反應傾注在紙材的中間。 然後我們將拿走我們的刷子,我們將以一種非常一致但非常輕的模式慢慢地來回走動。 然後我們要切換,上下移動。 你可以開始看到那些筆觸會來自哪裡,當刷子敲擊結束時我會把它拿起來然後我回來了。 我正在做的是嘗試移動化學物質,使其被吸收到紙張中。
Certain papers are more absorbent than other papers. Sometimes it takes a little bit more work. If you've got a paper, like the BFK, the Rives BFK paper, is not as absorbent as some of the other papers at the get go, so one of the things you can do is you can use a chemistry called Tween 20 and it basically acts like almost, it feels almost like a soap and it helps break the surface tension of the paper. If you don't have that, just a little distilled water, and just paint a little distilled water over the area you're gonna coat. It'll break the surface tension of the paper and the chemistry will be easily absorbed. It's a pretty easy problem to solve. Basically, it's just a back and forth.
某些紙比其他紙更具吸水性。 有時它需要更多的工作。 如果你有一張紙,比如BFK,Rives BFK紙,不像其他一些紙一樣吸收,所以你可以做的一件事是你可以使用一種名為Tween 20的化學物質,它基本上就像幾乎一樣,感覺就像肥皂一樣,它有助於打破紙張的表面張力。如果你沒有那個,只需要一點蒸餾水,然後在你要塗的區域上塗一點蒸餾水。它會打破紙張的表面張力,化學物質很容易被吸收。這是一個非常容易解決的問題。基本上,它只是一個來回。
It should take about 30 seconds of back and forth for that chemistry to be absorbed. The key here is not to over-brush, because what happens as you start to over-brush is that surface of the paper is getting softer and you're gonna start pulling the fibers of the paper up, and you end up with this weird molting of the paper and modeling, and the paint chemistry doesn't get laid down evenly. So you wanna try to get nice and smooth, and nice and even. Also, if you realize the middle doesn't look quite right, you don't come back and fix it. Once the chemistry starts to set in, it's gotta just kinda finish its process.
它應該需要大約 30 秒的時間來回吸收化學物質。 這裡的關鍵不是過度刷,因為當你開始過刷時發生的事情就是紙的表面越來越軟,你要開始拉紙的纖維,你最終會有這種奇怪的感覺 蛻皮紙和造型,塗料化學成分不均勻。 因此,你想嘗試變得美觀,順暢,美好,均勻。 此外,如果你意識到中間看起來不太正確,你就不會回來修理它。 一旦化學開始進入,它就必須完成它的過程。
'Cause if you come back in later and put a brush stroke across, you will see that perfect brush stroke across your image. I have a lot of prints where I've got brush strokes across. The other one is I'll sometimes start with a diagonal but I'm always working left to right, top to bottom. I never go back to working diagonals, 'cause the streak marks become more apparent because of the long pull as the paper starts to dry. So you're gonna work left to right, top to bottom, in that process.
因為如果你以後回來並畫一個畫筆筆劃,你會在你的圖像上看到完美的筆觸。 我有很多印刷品,我有筆觸。 另一個是我有時會從對角線開始,但我總是從左到右,從上到下。 我永遠不會回到工作對角線,因為當紙張開始乾燥時長條紋會使條紋變得更明顯。 所以你要在那個過程中從左到右,從上到下工作。

---------------------------------------------------------------------------
E. 藥劑調配
For a cyanotype, we use parts A and parts B. Part A and Part B are used in equal amounts. If you're gonna process an image, you're gonna use, if you use 10 drops of A, you use 10 drops of B. For an eight by 10, about the size of the image we have there, we're gonna need about 40 drops. What we're gonna do is, we're gonna take off the cap to A. We're gonna pull up some drops in the eyedropper. And then we count the drops.
對於青色型,我們使用部分A和部分B.部分A和部分B使用相同的量。 如果你要處理一個圖像,你將要使用,如果你使用10滴A,你使用10滴B。對於 8x10 ,關於我們在那裡的圖像大小,我們需要大約 40滴(總共)。 我們要做的是,我們要把蓋帽取下來。我們要在吸管中拉一些水滴。 然後我們計算滴數(分別 20 滴)。
So that is all the chemistry, it barely even covers the bottom of the shot glass. That's all the chemistry we need to coat that piece of paper.
這就是所有的化學反應,它甚至幾乎都沒有覆蓋玻璃杯的底部。 這就是我們塗上那張紙所需要的所有化學成分。

---------------------------------------------------------------------------
F. 備妥刷子
What I'm gonna next do is pull my brush out and then I'm just gonna gently blot it into some paper towel and pull out that excess chemistry, or excess water that's in there. The brush is now damp, but not wet, no water's coming off when I paint my hand. But I can feel the dampness of the brush.
我接下來要做的就是拉出我的刷子,然後我只是輕輕地將它塗在一些紙巾上,然後抽出多餘的化學物質或那裡的多餘水分。 現在刷子是潮濕的,但是沒有濕潤,當我畫手時沒有水流出來。 但我能感受到刷子的潮濕。
---------------------------------------------------------------------------
G. 塗抹
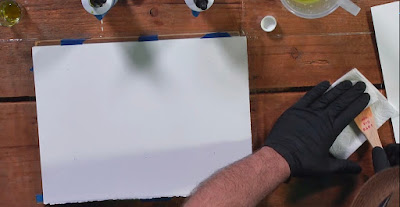
The next thing I'm gonna do is, I'm gonna take and pour the sensitizer in the middle of the paper. Tap out the excess and then I start that coating process. I'm gonna go back and forth.
接下來我要做的就是,我要把敏感劑倒在紙的中間。 挖出多餘的,然後我開始塗層過程。 我要來回走動。
I'm not pushing down, I'm literally just letting the fibers of the brush drag across the paper. I make sure I get outside my edge of my line. That's it. Then I'm gonna stop, brush goes back in. Now that page can go sit and get ready to be dried. You usually want to set, for this process, you can let the paper sit for a couple of minutes and then you can hit it with a blow dryer. You're gonna blow dry on low heat from the backside of the paper and that's gonna help pull some of the chemistry into the paper and speed up the drying process.
我不是在推倒,我只是讓畫筆的纖維拖過紙張。 我確保自己超出了我的優勢。 而已。 然後我會停下來,刷回去。現在那個頁面可以坐下來準備乾。 你通常想要設置,對於這個過程,你可以讓紙張靜置幾分鐘,然後你可以用吹風機打它。 你要在紙張背面用低熱量吹乾,這樣可以幫助將一些化學物質吸入紙張中,加快乾燥過程。
If you do that, you'll want to do that in a well-ventilated area and probably wear a mask because it can kick up some of the particulate off of the paper if it gets bumped or some of it comes off. That's one of the reasons to always dry from the back of the paper. 'Cause then you're pulling the chemistry back in. There are people who blow dry the front to speed it up but that's what causes that iron to kick off and you just wouldn't want to inhale that. Once you've got your chemistry all sensitized, then you definitely want to go back and recap your chemistry.
如果你這樣做,你會想要在通風良好的地方做這件事,並且可能戴上面具,因為如果碰到碰撞或者有些顆粒脫落,它會將一些顆粒從紙上拉出來。 這是紙張背面始終乾燥的原因之一。 因為那時你正在把化學物質拉回來。有些人吹乾前面以加速它,但這就是導致鐵開始的原因,你只是不想吸氣。 一旦你的化學反應變得敏感,那麼你肯定想回過頭來重溫你的化學反應。

---------------------------------------------------------------------------
H. 其它
update: 2019/03/24
reference:
1. Black and White Ink Products & Software - Piezography
2. QuadToneRIP Overview
3. CreativeLive: Free Live Online Classes
4. Introduction to Alternative Processing in Photography
5. CreativeLive Classes
6. Creating the Step Wedge for Curve Corrections
7. Organizing Your Photoshop Files and Curves
8. Setting Up the Printer
9. Setting the Maximum Black Time
10. Getting the Initial Curve Test Numbers
11. Correcting the Curve
12. Printing the Curve
13. Sharing Curves
14. Paper and Brush Types
15. UV Light Box
16. 8x10" Contact Print Frame
---------------------------------------------------------------------------

A. 紫外線曝光機(UV Light Box)
參考: UV Light Box
We're in the 320 to 400 nanometer wavelength, medium length ultraviolet light. It's a consistent source of light for us.
我們的波長在 320 到 400 納米,中等長度的紫外線。 這對我們來說是一致的光源。

B. 放置數位負片
you can see I've got the image just a little bit higher on the piece of paper, than the bottom. That actually creates the optical illusion of it being centered. If it's got a little bit of weight to the bottom, our eye just believes it's gonna be a little bit higher, and I kinda ballpark center of left to right.
你可以看到我的紙張上的圖像比底部高一點。 這實際上創造了它居中的視錯覺。 如果它的底部有一點重量,我們的目光只會相信它會更高一些,而且我從左到右都是一個棒球場中心。
C. 塗抹位置標記
Then what I'm going to do, is take my pencil and I'm just gonna make a little tick mark kind of at the edges of where my coating area is. And this just is at the edge of the negative and it allows me to know where the negative is so that I know where to start and stop the coating process. I don't worry about it being super exact because I'm gonna go outside the lines as I coat. Now I've got my little tick marks where the coating's gonna be.
然後,我要做的就是帶上我的鉛筆,我只是在塗層區域的邊緣做一點刻痕。 而這只是在負面的邊緣,它讓我知道負面的位置,以便我知道從哪裡開始和停止塗層過程。 我不擔心它是非常精確的,因為我會穿著外面的線條。 現在我的塗層就會出現小刻痕。


D. 化學藥劑
If we look at the chemistry for cyanotypes, we have two: we have a part A and a part B. It's a ferric ammonium citrate and it's potassium ferrous cyanide, are the two chemicals together that make up a cyanotype solution. What happens is, when the two chemicals mix together, and they're exposed to UV light, the ferric ammonium citrate, green, actually becomes a ferrous metal.
如果我們看一下氰化型的化學反應,我們有兩個:我們有A部分和B部分。它是檸檬酸鐵銨和氰化亞鐵鉀,它們是組成一種氰化物溶液的兩種化學物質。 當兩種化學物質混合在一起,並且它們暴露在紫外線下時,會發生檸檬酸鐵銨,實際上變成黑色金屬。
So that's what stays as the residual metal in the print that gives us the ultimate look of the cyanotype. It's also the interaction with the potassium cyanide which gives it the blue color. We need those two together to actually create the chemical reaction when it's exposed to ultraviolet light. The cool part about a cyanotype is it's not hyper-sensitive to ultraviolet light, so you can actually coat under pretty normal lighting conditions. A 40 watt, 60 watt tungsten bulb, which is like a normal household bulb, you could easily coat under that with no real impact. Fluorescent bulbs will have a little bit of UV light in them and could cause an impact.
這就是印刷品中殘留金屬的含量,它為我們提供了最佳的冷色調外觀。 它也是與氰化鉀的相互作用,使其呈現藍色。 當暴露在紫外線下時,我們需要這兩者一起實際產生化學反應。 關於冷色調的冷卻部分是它對紫外線不敏感,所以你可以在非常正常的光照條件下進行塗層。 一個40瓦,60瓦的鎢燈泡,就像一個普通的家用燈泡,你可以很容易地在它下面塗上,沒有真正的影響。 熒光燈泡中會有一點紫外線,可能會產生影響。
This is a very light, even touch. We don't want the chemistry to get onto the sides of the brush. We want it to stay down on to the tips of the brush. It's mostly an arm movement. It's not wrist motion, it's an arm motion. It takes practice.
這是一種非常輕盈,均勻的觸感。 我們不希望化學物質進入刷子的兩側。 我們希望它能夠深入了解畫筆的提示。 它主要是手臂運動。 這不是手腕運動,而是手臂運動。 這需要練習。
What you're gonna do is, we're gonna pour that chemistry kind of in the middle of the paper. And then we're gonna take our brush, and we're gonna slowly go back and forth in a very consistent, but very light pattern. Then we're gonna switch and go up and down. You can start to see where those brush strokes would come from, as the brush hits the end and I pick it back up and I come back down. What I'm doing is trying to move the chemistry along so that it'll be absorbed into the paper.
你要做的是,我們將把這種化學反應傾注在紙材的中間。 然後我們將拿走我們的刷子,我們將以一種非常一致但非常輕的模式慢慢地來回走動。 然後我們要切換,上下移動。 你可以開始看到那些筆觸會來自哪裡,當刷子敲擊結束時我會把它拿起來然後我回來了。 我正在做的是嘗試移動化學物質,使其被吸收到紙張中。
Certain papers are more absorbent than other papers. Sometimes it takes a little bit more work. If you've got a paper, like the BFK, the Rives BFK paper, is not as absorbent as some of the other papers at the get go, so one of the things you can do is you can use a chemistry called Tween 20 and it basically acts like almost, it feels almost like a soap and it helps break the surface tension of the paper. If you don't have that, just a little distilled water, and just paint a little distilled water over the area you're gonna coat. It'll break the surface tension of the paper and the chemistry will be easily absorbed. It's a pretty easy problem to solve. Basically, it's just a back and forth.
某些紙比其他紙更具吸水性。 有時它需要更多的工作。 如果你有一張紙,比如BFK,Rives BFK紙,不像其他一些紙一樣吸收,所以你可以做的一件事是你可以使用一種名為Tween 20的化學物質,它基本上就像幾乎一樣,感覺就像肥皂一樣,它有助於打破紙張的表面張力。如果你沒有那個,只需要一點蒸餾水,然後在你要塗的區域上塗一點蒸餾水。它會打破紙張的表面張力,化學物質很容易被吸收。這是一個非常容易解決的問題。基本上,它只是一個來回。
It should take about 30 seconds of back and forth for that chemistry to be absorbed. The key here is not to over-brush, because what happens as you start to over-brush is that surface of the paper is getting softer and you're gonna start pulling the fibers of the paper up, and you end up with this weird molting of the paper and modeling, and the paint chemistry doesn't get laid down evenly. So you wanna try to get nice and smooth, and nice and even. Also, if you realize the middle doesn't look quite right, you don't come back and fix it. Once the chemistry starts to set in, it's gotta just kinda finish its process.
它應該需要大約 30 秒的時間來回吸收化學物質。 這裡的關鍵不是過度刷,因為當你開始過刷時發生的事情就是紙的表面越來越軟,你要開始拉紙的纖維,你最終會有這種奇怪的感覺 蛻皮紙和造型,塗料化學成分不均勻。 因此,你想嘗試變得美觀,順暢,美好,均勻。 此外,如果你意識到中間看起來不太正確,你就不會回來修理它。 一旦化學開始進入,它就必須完成它的過程。
'Cause if you come back in later and put a brush stroke across, you will see that perfect brush stroke across your image. I have a lot of prints where I've got brush strokes across. The other one is I'll sometimes start with a diagonal but I'm always working left to right, top to bottom. I never go back to working diagonals, 'cause the streak marks become more apparent because of the long pull as the paper starts to dry. So you're gonna work left to right, top to bottom, in that process.
因為如果你以後回來並畫一個畫筆筆劃,你會在你的圖像上看到完美的筆觸。 我有很多印刷品,我有筆觸。 另一個是我有時會從對角線開始,但我總是從左到右,從上到下。 我永遠不會回到工作對角線,因為當紙張開始乾燥時長條紋會使條紋變得更明顯。 所以你要在那個過程中從左到右,從上到下工作。

E. 藥劑調配
For a cyanotype, we use parts A and parts B. Part A and Part B are used in equal amounts. If you're gonna process an image, you're gonna use, if you use 10 drops of A, you use 10 drops of B. For an eight by 10, about the size of the image we have there, we're gonna need about 40 drops. What we're gonna do is, we're gonna take off the cap to A. We're gonna pull up some drops in the eyedropper. And then we count the drops.
對於青色型,我們使用部分A和部分B.部分A和部分B使用相同的量。 如果你要處理一個圖像,你將要使用,如果你使用10滴A,你使用10滴B。對於 8x10 ,關於我們在那裡的圖像大小,我們需要大約 40滴(總共)。 我們要做的是,我們要把蓋帽取下來。我們要在吸管中拉一些水滴。 然後我們計算滴數(分別 20 滴)。
So that is all the chemistry, it barely even covers the bottom of the shot glass. That's all the chemistry we need to coat that piece of paper.
這就是所有的化學反應,它甚至幾乎都沒有覆蓋玻璃杯的底部。 這就是我們塗上那張紙所需要的所有化學成分。

F. 備妥刷子
What I'm gonna next do is pull my brush out and then I'm just gonna gently blot it into some paper towel and pull out that excess chemistry, or excess water that's in there. The brush is now damp, but not wet, no water's coming off when I paint my hand. But I can feel the dampness of the brush.
我接下來要做的就是拉出我的刷子,然後我只是輕輕地將它塗在一些紙巾上,然後抽出多餘的化學物質或那裡的多餘水分。 現在刷子是潮濕的,但是沒有濕潤,當我畫手時沒有水流出來。 但我能感受到刷子的潮濕。

---------------------------------------------------------------------------
G. 塗抹
The next thing I'm gonna do is, I'm gonna take and pour the sensitizer in the middle of the paper. Tap out the excess and then I start that coating process. I'm gonna go back and forth.
接下來我要做的就是,我要把敏感劑倒在紙的中間。 挖出多餘的,然後我開始塗層過程。 我要來回走動。
I'm not pushing down, I'm literally just letting the fibers of the brush drag across the paper. I make sure I get outside my edge of my line. That's it. Then I'm gonna stop, brush goes back in. Now that page can go sit and get ready to be dried. You usually want to set, for this process, you can let the paper sit for a couple of minutes and then you can hit it with a blow dryer. You're gonna blow dry on low heat from the backside of the paper and that's gonna help pull some of the chemistry into the paper and speed up the drying process.
我不是在推倒,我只是讓畫筆的纖維拖過紙張。 我確保自己超出了我的優勢。 而已。 然後我會停下來,刷回去。現在那個頁面可以坐下來準備乾。 你通常想要設置,對於這個過程,你可以讓紙張靜置幾分鐘,然後你可以用吹風機打它。 你要在紙張背面用低熱量吹乾,這樣可以幫助將一些化學物質吸入紙張中,加快乾燥過程。
If you do that, you'll want to do that in a well-ventilated area and probably wear a mask because it can kick up some of the particulate off of the paper if it gets bumped or some of it comes off. That's one of the reasons to always dry from the back of the paper. 'Cause then you're pulling the chemistry back in. There are people who blow dry the front to speed it up but that's what causes that iron to kick off and you just wouldn't want to inhale that. Once you've got your chemistry all sensitized, then you definitely want to go back and recap your chemistry.
如果你這樣做,你會想要在通風良好的地方做這件事,並且可能戴上面具,因為如果碰到碰撞或者有些顆粒脫落,它會將一些顆粒從紙上拉出來。 這是紙張背面始終乾燥的原因之一。 因為那時你正在把化學物質拉回來。有些人吹乾前面以加速它,但這就是導致鐵開始的原因,你只是不想吸氣。 一旦你的化學反應變得敏感,那麼你肯定想回過頭來重溫你的化學反應。

H. 其它


留言
張貼留言